Welcome!

I am very happy to share my work with all of you. I still in the beginner stage but I am having lots of fun.
I hope you enjoy it!

Millie Perez - Alfonso

Tuesday, April 30, 2013

Newlyweds - CM Divine Wedding

Another Wedding on the way:
Our friends from New York will be celebrating their wedding and since we cant go and be part of the event, I decided to create a special card/invitation for them:
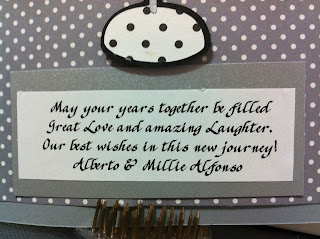
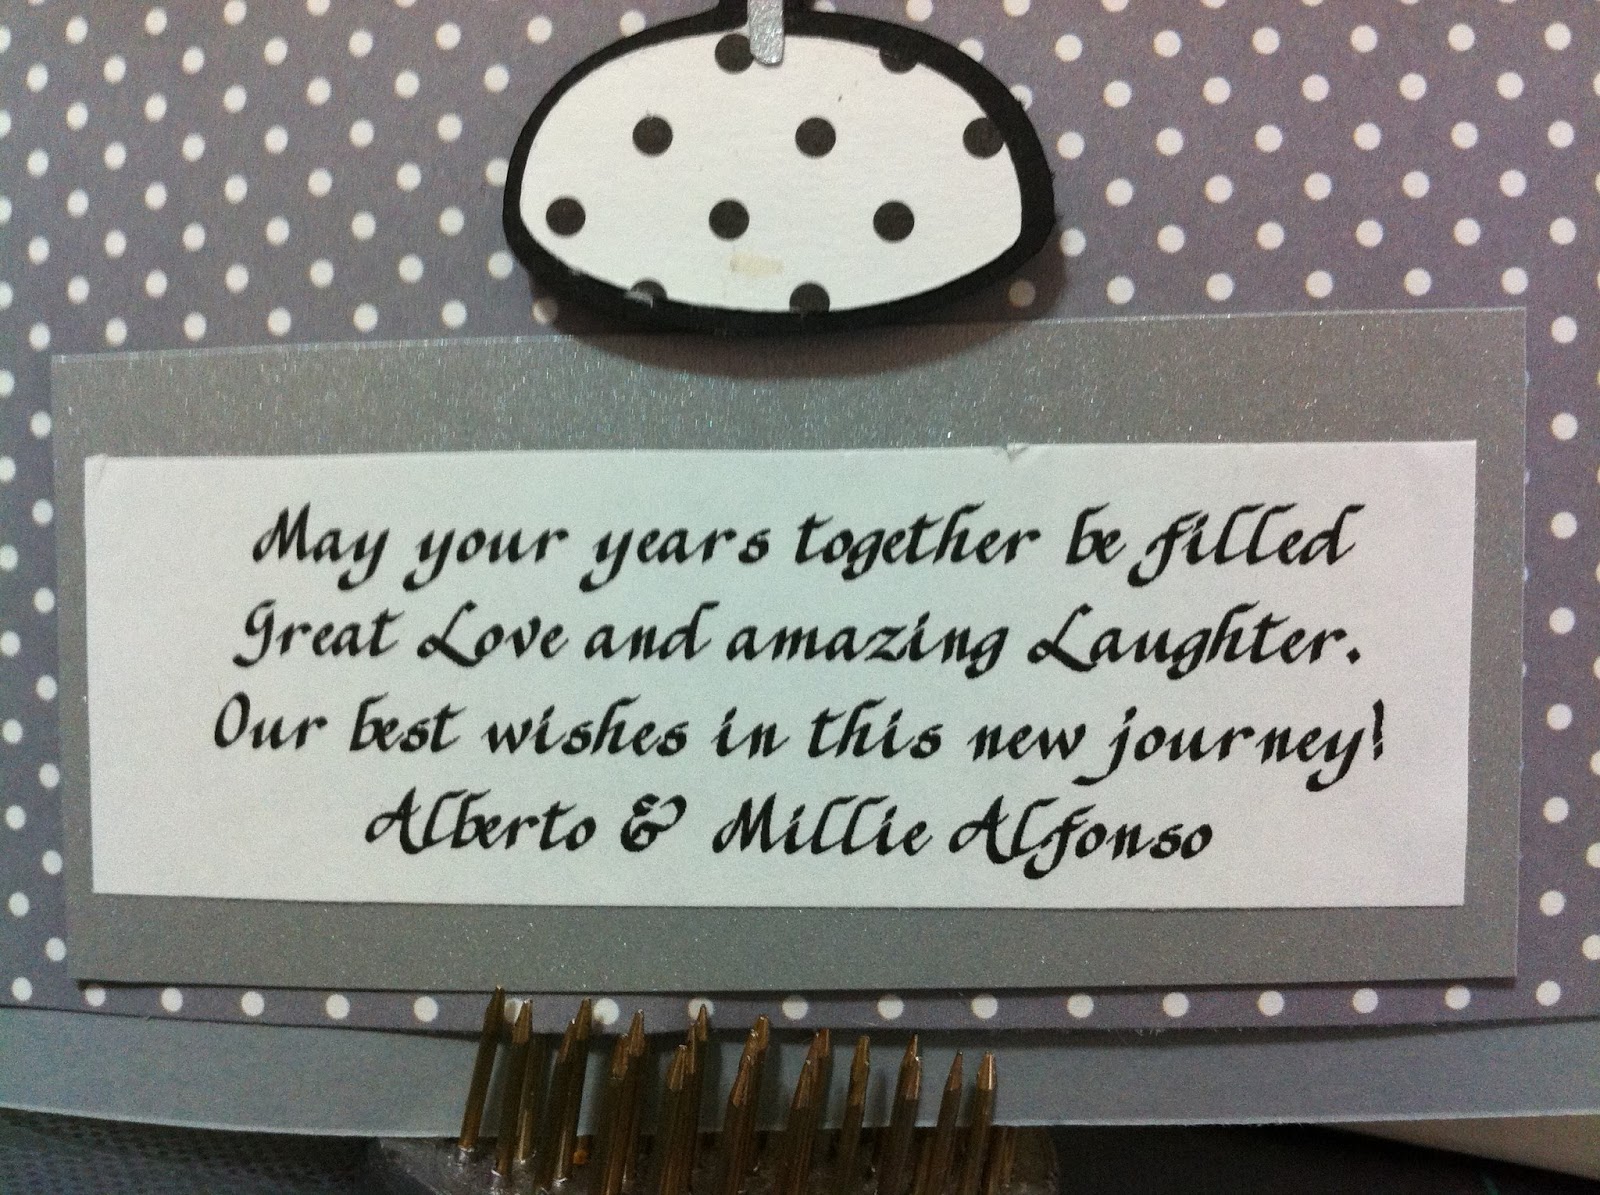
The card was cut in gray shine card stock,5 x 10, using the combination of white and black polka dots for the button and printed b/w designed.


To give some texture to the invitation, I add a white ribbon with a bow on the front.

Then I add Mr & Mrs from CM Divine Memory phrases and a black and gray artistic frame to highlight the names.  Also, this was mounted in adhesive foam squares.


On the inside a Reserve table sign with their names.

Using the computer I write our best wishes to celebrate this moment in a very special way.


Since the card became to large, I cut an envelope to wrap the card as a gift.  Using the same cartridge I cut newlyweds from phases in black and cut a peace bigger to be used as a border in polka dots b/w paper.
 
Many blessings in your new life together.


Birthday Card - Elegant Edges

Ok, this project was hard, because was the Birthday card for my friend Carmen the one that introduce me to the cricut world.  She made beautifullll cards.  Since recently we went to Washington DC to see the cherry blossoms, I used the Cherry blossoms inspiration for her card.
 
The card was cut 10" x 5".  To decorate the center I used Elegant Edges Cartridge cut in 4".  The 50 number was cut in 3".  The pink paper was used as a border to the line paper on top, decorated with the cherry blossom flowers around.

 
For the inside, I used the reverse of the paper that has flowers and wrote in the computer:  50 means, groovy, cool. awesome.  Happy Birthday BFF!  Many blessings and lots of fun!  I used pink font color to highlight the card.  Some of the cherry blossom flowers where place in the shape of the printer flowers to decorates more the inside.
 
Carmen, I hope you like it.  Happy Birthday my Friend, and Thank You for my new addiction to the Cricut World.!
 

Nautical Theme Party

This is a super fun project that I help my best friend Edith from Puerto Rico.  I just received a call to do a party in a boat, and boom all the nautical theme came into  my mind.  Here some of the creations that I made for her.
Invitation:
  • The invitation is 7 x 5 in white card stock paper. 
  • For the decoration I cut a white and red paper about 2".
  • To decorate the invitation I did a nautical node using Jute twine (3 times around)
  • The anchor is was cut from Cricut Cartridge Mickey and Friends (3")


 Banner:
  • For the banner I cut my friends name at 8" tall.
  • Each letter was decorated with some nautical image from the Cricut Cartridge Life is a Beach.
  • All the letters were glue to a nest from the Dollar store.


I hope you like the idea.  Enjoy!

Wedding Card

Hello,
Its being several months until I posted my last project.  I am happy to be back and show some of the projects.  The first one is a Wedding card made with love to our friend Dwayne.  I used the Creative Memory Divine Wedding:
FRONT:
  • The card was cut 12x6
  • the front will be fold in half
  • the love signed was cut shadow and border in 4 x 4
  • Only the left art is glue to be able to open the card.
 

 INSIDE:
  • The inside of the card used the phrase, Today, Tomorrow & Always.  the phrase was cut 5"  wide.  The inside has a border paper with gray and white polka dots like the front car.  The shadow was cut in white and the letters in black.


I hope you like it.  It was a very special wedding gift for a special couple.
Enjoy!

Monday, February 11, 2013

Kids Valentine Card - Create a Critter 2

I'm so happy to be back to my Cricut.  This time I found a challenge from Fantabulous Cricut Challnge Blog, #148 be my valentine that gave me inspiration to create a card for my daughter and son for Valentine's Day. " Love is in the air."  I used Create a Critter 2, a great gift from my Cricut mentor Carmen.

Patty's Card: (Girl)

She loves Koalas, and Create a Critter 2 has the most cute Koala.  Also I used the wiggle tags to make more emotion and movement into the Koala.


Outside:
Koala - cut 2 1/2"
Card - 5 x 10"
Stamp - Just because
Inside:
Letters - Hugs and kisses, flowers cut 2 1/2"

Carlos Card: (Boy)
My son is a fanatic of hug and kisses, but specially if Hershey's Kisses are involved!  For Him I cut the cupid Hug n Kisses and make an arrangement of kisses from him.  (Also Creative Creater 2) 


Outside:
Card: 8 1/2" x 8" - in the center for folding I did some lines to make it easy to fold.
Hugs n Kisses letters - cut 2 1/2"
Flower bouquet - cut 5"
In this case it was not necessary to cut the flowers, since I was going to put the kisses.


Sunday, December 2, 2012

Warm Wishes Bags - Doodlecharms & Tags, Bags & More 2

Hello:

Its being a wail since I posted my last project, but were being busy.  Today I will like to share with you the Holidays Bag that I'm going to give to my coworkers.  Its a great inspiration from Pinterest and a great Cricut project.

The bag is from the Dollar Store and includes:  Hot chocolate, 2 candy canes, 1 chocolate bar Ghirardelli and mini marshmallows.

 
The front card is 2 1/2 x 5 1/4 inches.  The phrase Warm Wishes is from Doodlecharms.


In the bag, I used Lettering Delight Chill Out font to write our message.
 
I think this project is adorable, easy to make  and low budget.
 
Happy Holidays!


Thursday, September 27, 2012

Happy Birthday Mustache - Forever Young

My best friend daughter turned 20! OMG! driving, college, boyfriend, etc....I am not ready for that.  We celebrated her birthday with a Mustache Party.  It was super cool!  Everybody had a mustache including the card that I did for her.  Today I saw that Fantabulous Cricut Challenge has a new challenge about birthday cards.

 
Cartridge: Forever Young
I cut a 5" x 10" card and folded one half and the other half in two half. I followed the instructions from How to Make Easel Cards from ScrapTutor.com. Then I cut one piece 5"x5" to created the front of the card. On the 5 x 5 I embossed using the Happy Birthday stencil. To decorate the front I cut a female silhouette 5" with a short dress from Forever Young. I used her favorite colors, purple and lavender. For the mustache I used my Billionaire Cartridge. ON the inside I wrote: "Le mustache Glamour".
 
The mustache was from Billionaire, Cricut Lite.


The letters I used are from  Billionaire Cartridge.

 
I hope you like it.  We had a wonderful mustache celebration!