Welcome!

I am very happy to share my work with all of you. I still in the beginner stage but I am having lots of fun.
I hope you enjoy it!

Millie Perez - Alfonso

Sunday, August 19, 2012

Back to School Box - Tags, Bags, Boxes and More 2 & Locker Talk

Today I will like to show you the little boxes that I made for my daughter's Principal and Assistant Principal as a thankful appreciation and attention to my daughter.  On the inside, they will find a mini tissue box.
First I used Tags, bags, boxes and more 2 to create the box.  The box was cut 7"x8" in the section cutting option.  One's you glue the parts the action starts.

On the top front part will be the Names.  Front panel  used First day of school signed from Locker Talk,

On the side I used Good job! from Locker Talk in blue, red and yellow combination.


A+ to keep celebrating that our school is an A+/

On the other side, the books that will inspired our children's to study.

And only in one box I used a Pencil with a piece of ribbon and a Viking Label
to honor our Vikings students.

On the Inside they would find a mini card from Locker Talk, with an apple accent to write the thank you note.  Mini card cut 3" x 3".

On the back I used the handmade by stamp from G Studio to signed and give a personal touch.

I hope you like it.

Saturday, August 11, 2012

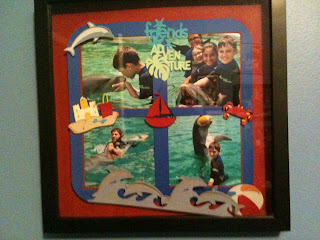
Life is a beach -Part 2- Dophin frame

OK, my son wants a dolphin frame for his room, since I did one for my daughter.  He had a great experience swimming with the Dolphins for his 11th birthday.  Since I used Life is a Beach cartridge to do my daughters frame, I decided to used the same but with different elements:


I used Life is a Beach to cut the dolphin, friends, adventure, the sand castle, the boat an the border of the dolphins.  I used a red cardboard 12x 12 and a blue 10 x 10 with 4 rectangles to place the pictures.  At Michael's I bought a memory box frame to displayed it in this room with a black frame.


Create memories with family and friends!

Friday, August 3, 2012

Pack your bags - Birthday Card

Hello Everybody:

Summer is almost over but we are planning to have a weekend at Ft. Myers Beach with our friend Judy that is celebrating her birthday.  For her I designed a card just like her, a good drink, beach and sun.  I used Pack your Bags, for all the layout.

I cut the card 5" x 10".  The palms and the figure were cut 4". 


Inside the phrases I selected Peace & Quiet for the message.  The amapola flower is part of the
Pack your bags.

Happy Birthday My Friend, I hope you like it!


Thursday, August 2, 2012

BBTB2 Farm Challenge - Animal Kingdom, Paper Dolls Dress Up, Country Life

Hello Everybody:
Today I was creating a card for BBB2 for the Farm challenge.  It's was very hard to create a card using many animals from the farm for a friends birthday party.  I cut 4 cards 7 x 5 as background.
Then I decorated the front of the card with blue sky 4" wide and green for the bottom 3" wide.
The cartridges used were:
  • animal kingdom - pig, cat, dog, duck, horse, cow, hen, chicken and lamb
  • Paper dolls dress up - sun, letters, grass
  • Country life- farm, banners

Gianna's Little Farm Birthday Party #2

Page 1 had the pig on a mud poodle.  The fence (3 cuts) goes all the way from left to right in three cuts up to the farm.
The grass was from Paper Doll Dress Up (Tabs) and the cat and the duck were from Animal Kingdom.


Page 2 had a horse, cow, chicken (sitting in top of the horse) and the sun. To create the mountain as part as the sun I used a piece of the same green used in the sun based from Country Life.

Page 3 is the barn from Country Life and sheep and the dog from Animal Kingdom.  On the wind mill I have the banner for her birthday #2.   The farm was cut 7" tall to give altitude to the page.
  The cloud is from Paper doll dress up.  I took a close up look of all the animals.  All were cut in 2" height, except the pig that was bigger.
The sheep was cut in gray and also in white.


I love the dog, looks so real.

I hope you like my farm..

Tuesday, July 31, 2012

Oh Baby challenge - nursery rhymes & playtime

Hello Everybody:
Today I created a card for Oh Baby Challenge sponsor by My Craft spot.  It was so fun to used my niece latest pictures.  The card was cut 7" x 5".

For each picture I cut a 2" x 2" squares for the pictures in various colors and prints.
Ones I finished the card, I feel that something was missing and I add the ribbon on the border to give more girly touch to the card.

The pictures were allocated in each square. 

Picture 2

Picture 3

The letters for "Oh baby!" was cut with Nursery Rhymes.

The bow decorated my favorite picture.

For the inside I used a pots colorful paper cut 6.75" x 4.75".  To decorate the inside with the message I used Cricut Lite - Playtime.

I love it, I can wait to see my little princess soon!

Sunday, July 29, 2012

Wedding Challenge - Divine Wedding


Tonight I designed a card for Fantabulous Cricut Challenge.  The cartridge that I used was from Creative Memory - Divine Wedding.  The card was cut 5.25" x 10.  The designed used was the card and bride and groom.   The background was cut in pink and embossed with textile texture.


The tag was cut with the monogram designed and the tag number is the wedding date.


The dress was cut in white and embossed with cuttle bug dots.

I add a detail of light blue Tull to give more dimension to the bride.


The inside of the card was made using phrase "just married", that I love it.  The background was embossed using the same textile texture file.


I hope you like it!

Thursday, July 26, 2012

Christmas in July Challenge - Life is a beach

Hello, today I worked in the Christmas in July Challenge sponsor by Bitten by the bug 2.  I create a card that was in my mind for a long time and finally was created.  The Cartridge used was CCR Basics and Life is a beach.


 The main frame was cut 7"x5". Then the base for the picture was cut from Room Basics - Round Square 6.5" x 4.7". The picture I used originally was 4"x6" but I trimmed the sides.


 From Life is a Beach I cut the palm trees in two sets, and one was flip to be in the other side of the frame.


The words Merry Christmas was cut using George and Basics, cutting two: standard and another set in shadow. Also with this cartridge I cut 2012 using the charms and a background charms to all. The detail with the ribbon was to hold the years and give some dimension to the frame.


To show the labels I used the foam mats in all the levels.  I hope you like it and we can celebrate again Christmas in July!